Portal
This document will guide you through the step-by-step process of how to navigate the OneLab portal. We break down the process into four stages, which will show you:
- How to sign up: The first stage will show you how to create a new account in the new Onelab portal and to get access to the federated resources.
- How to manage your account: This section will tell you how to manage your profile. You will learn how to change your password and how to download your public/private key pair.
- How to set up an experiment: This stage of the process will tell you about labs, experiments, and resource reservation. Here you will learn how to create and join labs, how to create and use an experiments, and how to add resources for your research.
- How to get started with your allocated resources: In this last stage, you will learn how to access and manage your resources in order to launch an experiment. From this step, you will then be directed to further tutorials that are specific to the types of experiment you will deploy.
Sign-up
Access the OneLab Portal at https://portal.onelab.eu/. By signing up with an account on the OneLab portal, you will have access to its federated resources. In this section, we outline the sign-up process and show you how to create an account.
From the OneLab portal homepage, click on the “sign up” link to access the registration page.

Portal homepage.
Complete the registration form with your personal information, email and password. Be sure to read and agree to the terms and conditions by checking the box.

User sign-up form.
After you have filled out the account creation page, click the sign up button. A new page will appear confirming that your information was received and an activation link has been sent to your email.

User sign-up received.
You will receive a confirmation email on the email account with which you have registered. Click on the activation link in the email, and you will be taken to a new page directly on the OneLab portal. Please check your spam box if you do not receive the email in a few minutes.

Email Confirmed.
Please note that even after activating your account, you will still need to wait until a manager validates your request to have access to the portal (this process can take several minutes or hours).
Once a manager has validated your account request, you will receive a notification email. You will now have full access to the OneLab portal.
In the event that a manager does not validate your request, you will also be notified by email.
Dashboard
When you login to the portal, you will be redirected to the dashboard. It provides an overview of your account, your current labs and experiments, and also your ongoing reservation. But not only that, it also provides links and shortcuts so you can download your private and public ssh keys, and reserve resources.

Portal dashboard.
Under “Available resources”, you have the federated resources that you can reserve through the Onelab portal with a short description of each testbed.
Account Management
Once you have been approved by a manager, you will have full access to create labs and experiments, and to browse and reserve resources on the portal. This section shows you how to manage your username and password that have been created and are used to connect to the portal; download your public and private key pair that is used for testbed access; and delegate credentials that you give to the public/private key pair in order to allow the portal to access the testbeds on your behalf.
You may click on your “profile” link from the menu to manage your account. From this tab, you may download your public and private keys, and change your username and password.

Account management.
Labs Management
Labs are the means through which users are organised within OneLab. A lab is composed of a set of users, and within a lab exists one or several experiments. In this section, we will show you how to set up a lab, add experiments to a lab and add resources to an experiments. An experiment is a collection of testbed resources —such as wireless nodes, virtual machines, etc.— that you will use in your research, plus the users who are authorised to access the resources. All of the users within a lab are able to access the lab’s experiments.
Lab
Once your account is set up on and you have full access to the portal, you may create a new lab and/or join an existing one to begin experimentation.
The Labs Management tab displays all your labs and provides advanced configurations for your labs. In this tab, you can create a lab, display additional information about your labs, add new user to the project, and also to delete the lab.

Lab management.
To create a new lab click on Create a lab and you will be redirected to a form, complete the form with the lab name, and a short description of the project. Click on “Create New Lab” and a new page will appear confirming that the request is sent.

Request a lab form.
If you wish to join an existing lab, you will need to contact your project manager to add you to the lab.
To add users to the lab, click on the add user button.
To remove the lab, click on the delete lab button. Deleting a lab will delete all the experiments inside. Please think twice, as this action is unrecoverable.
Experiment
Once you have created or joined a lab using the Lab management, you may now create an experiment and reserve resources. Click on the add experiment button, and you will be invited to configure your slice.

Request an experiment form.
To remove an experiment, click on the X next to it.
Resource Reservation (IoT, Wireless)
Once your account is set up, you may now reserve resources from the federated testbeds.
To reserve resources from CloudLab and FITCloud, please refer to CloudLab Documentation and FITCloud Documentation respectively.
To reserve resources, go to the portal dashboard and under “Available resources”, you have the federated resources that you can reserve through the Onelab portal. Select the technology you want and click on “Reserve”. You will be redirected to the reservation page.
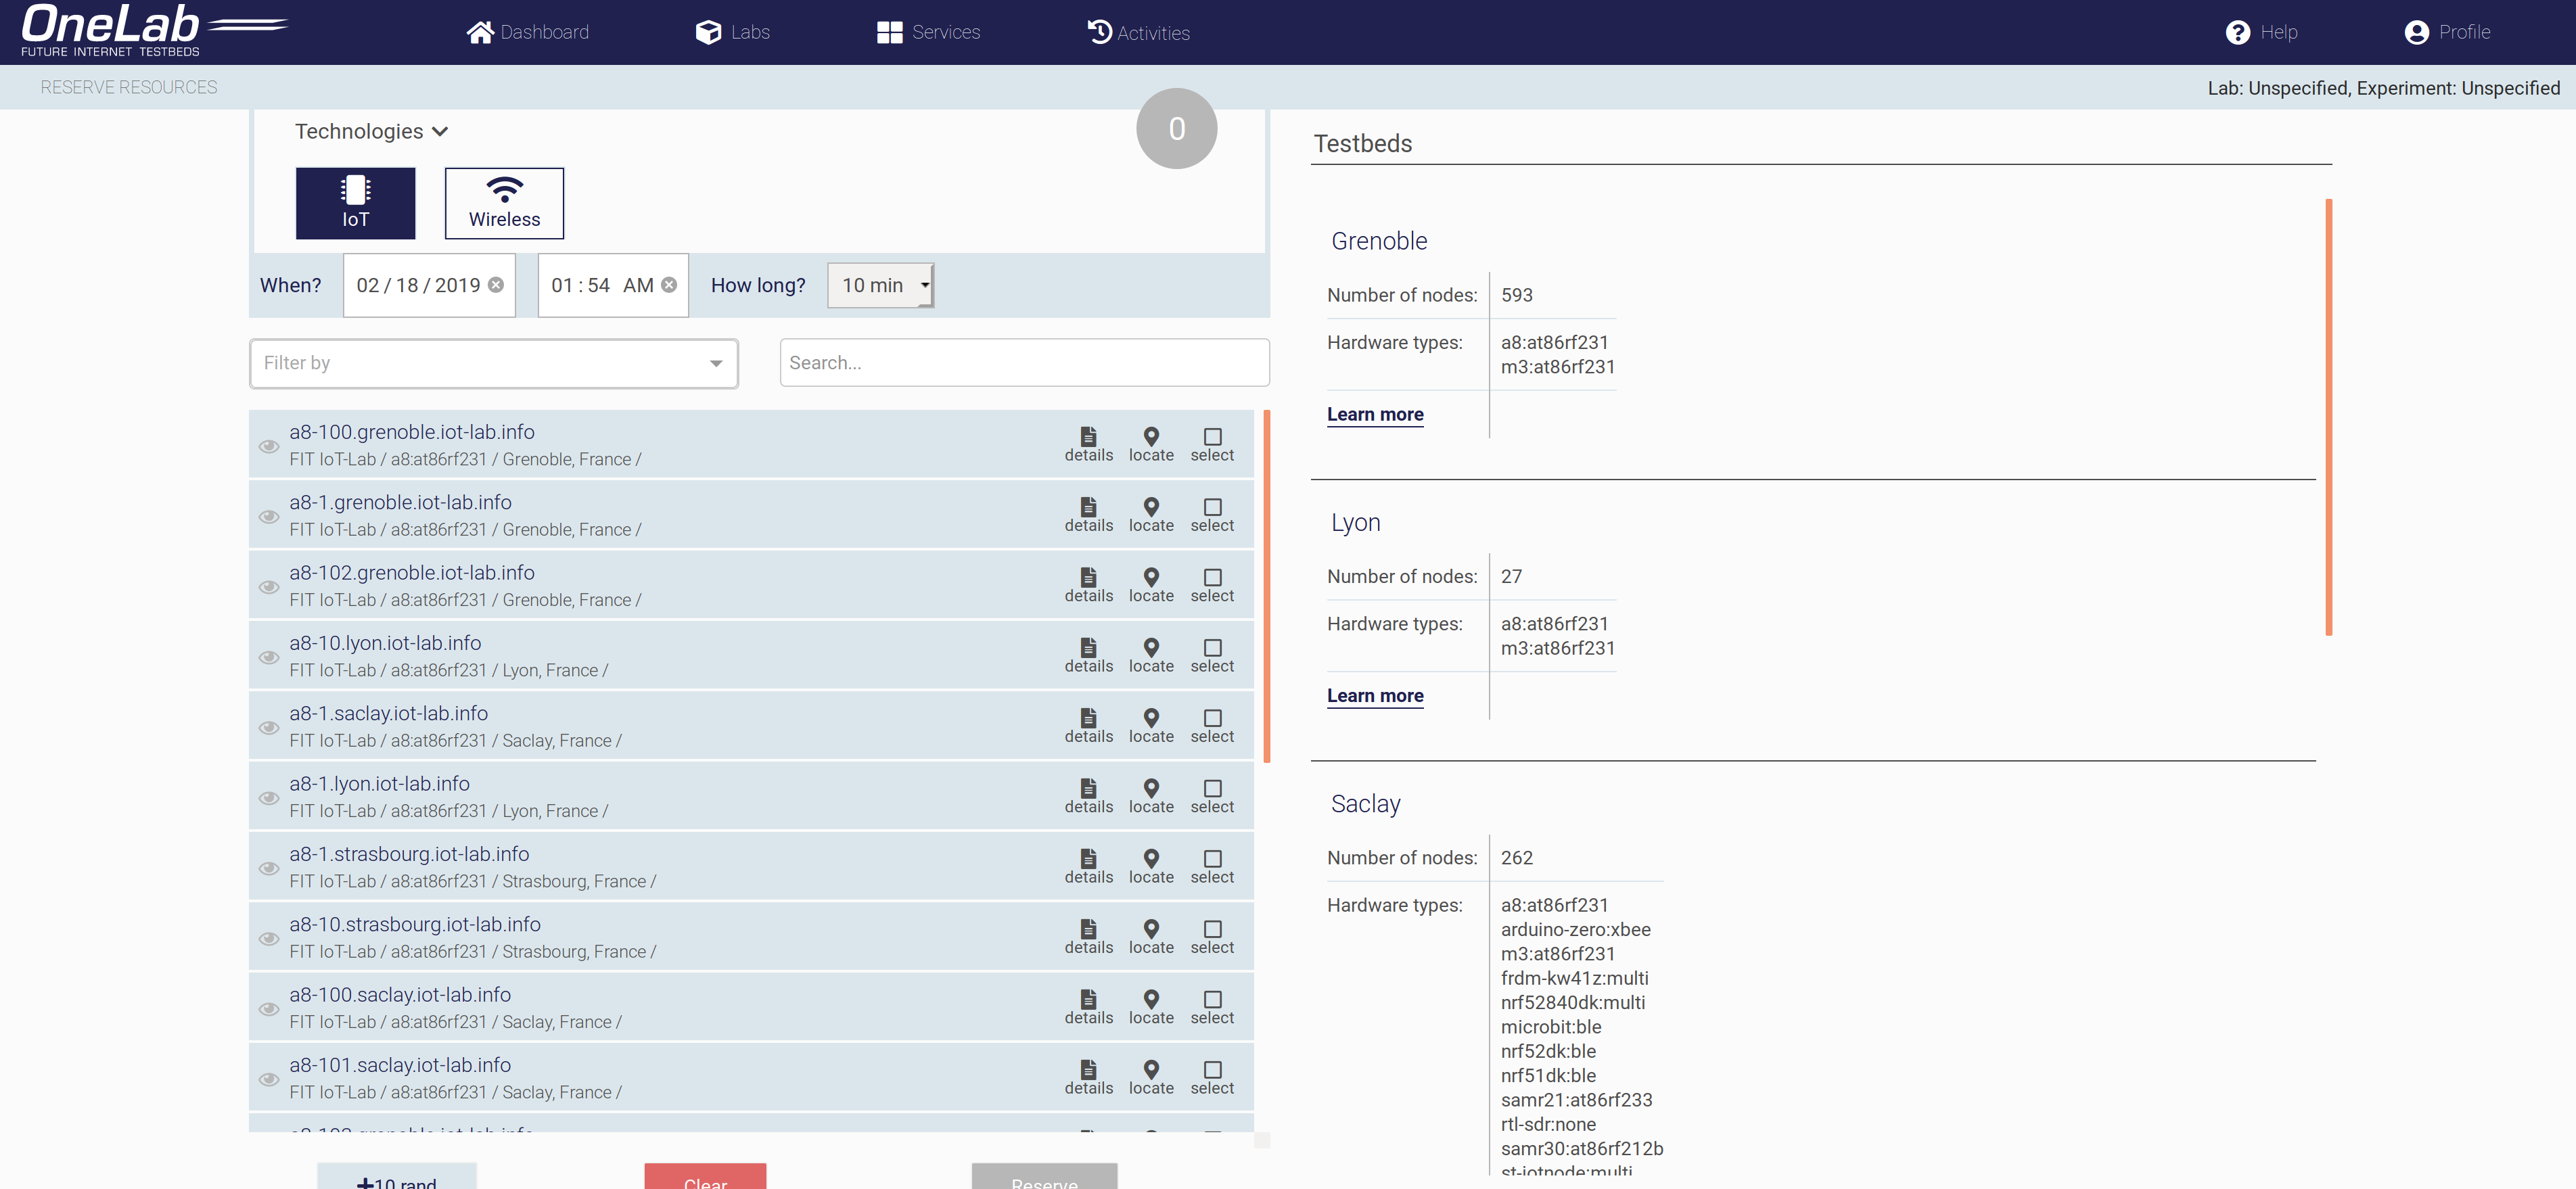
Reservation page
- Select the time and duration of your reservation. You can schedule your reservation for a later date
- You can use the “Filter by” to display specific nodes. You can filter by hardwares type and location
- From the scroll down list, you have the list of nodes. The nodes that are greyed-out are unavailable at the selected time slot. Select the interested nodes by ticking the select box.
- Click on the Reserve button when you are done, a very simple form will appear and you are invited to fill it out.
- Select the lab for your reservation. If you don’t have an existing lab, click on the new lab button, and give your lab a nice name to create one.
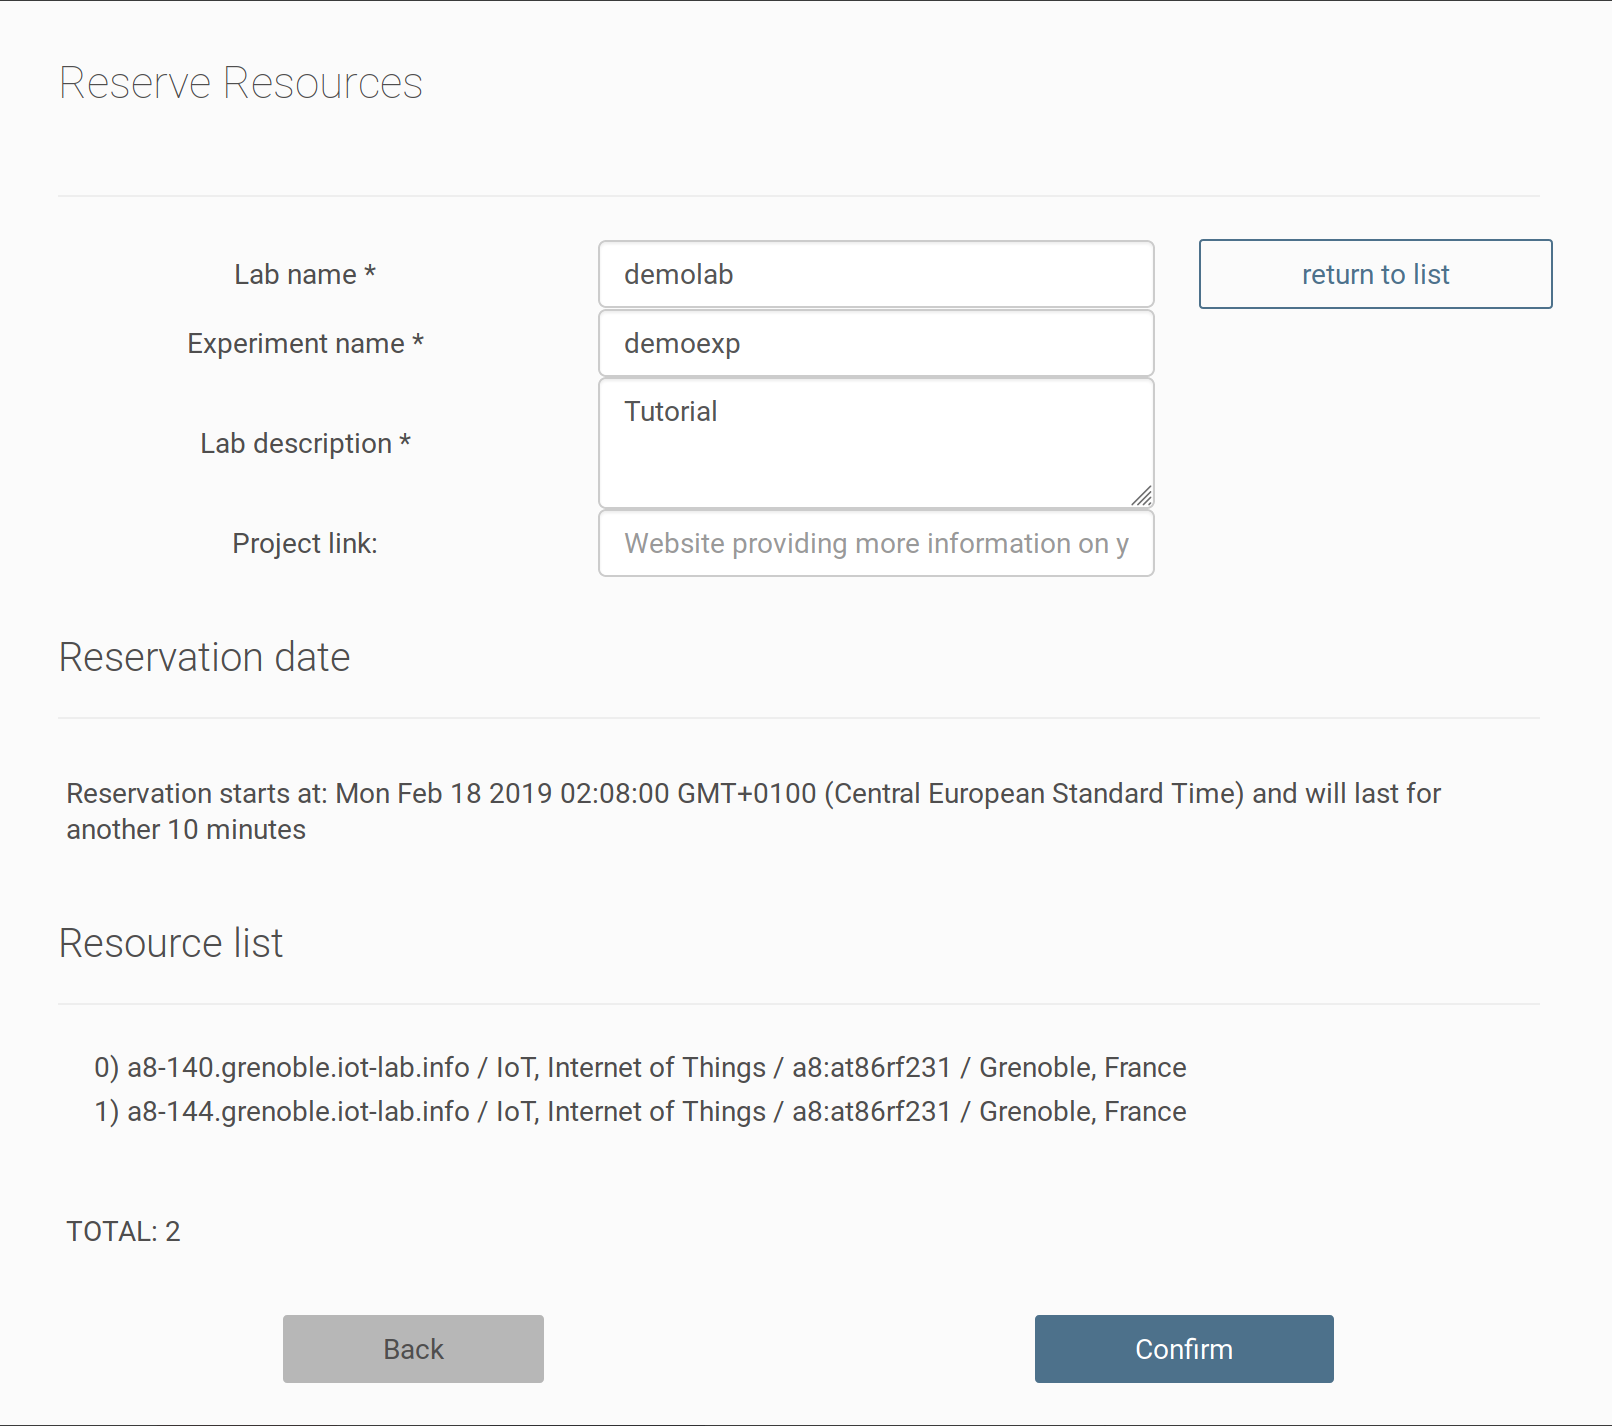
Reservation form
- Select the experiment where you wish to add the resources. You can create a new experiment with new experiment
- All that is left to do is to click on the Confirm button and the request will be automatically sent.
- If your reservation succeeded, you should see it in the dashboard under Your current reservations. Click on Go to your reservation to get more details about it.

Your current reservation
Start Experimenting
We’ve now shown you how to reserve nodes and schedule them if needed. You will now want to be able to run an experiment on these nodes. At this point, you have several options: you may launch an experiment control tool such as NEPI, OMF experiment controller, etc; or, you can access the reserved resources directly through SSH.
Accessing reserved resources
Once the reservation is complete, you will be able to access the reserved nodes using SSH. A general guideline to use SSH is explained below.
In order to access your reserved nodes through SSH, you must first download your private key. To do this, go to your “Profile” page and click the button “Download Private Key”.

Download your private key.
Once your private key is downloaded, you may then access any of your reserved nodes through SSH. For the Wireless and PLE resources, you must access them using SSH, but for the FIT IoT-Lab resources, you may opt to access them only through the GUI (explained below).
Linux OSs and OS X
Step 1: Download private key
Step 2: Open your command line tool (OS X and Linux users; for Windows use PuTTY)
Step 3: Paste the following command with the appropriate filename:
$ chmod 400 /path/to/your/privkey.txt
Step 4: Copy the SSH command from your experiment page
Step 5: Locate your private key with -i (examples shown below)
Example: We have downloaded our private key (Step 1) and opened our command line tool (Step 2). We then pasted:
$ chmod 400 privkey.txt (Step 3)
and copy/pasted the SSH command generated.:
$ ssh onelab.test.project_1.slice_1@griffin.ipv6.lip6.fr -i Downloads/privkey.txt (Steps 4 and 5).
For a step-by-step guideline on how to access, deploy and control experiments on the resources that you have reserved, please see our detailed guidelines by clicking on the links below:
Windows OS
- Step 1: Download private key
- Step 2: Download PuTTy and PuTTYgen from here
- Step 3: Open PuTTYgen and load the downloaded privatekey and save it (It will convert the downloaded key to PuTTY supported format - .ppk)
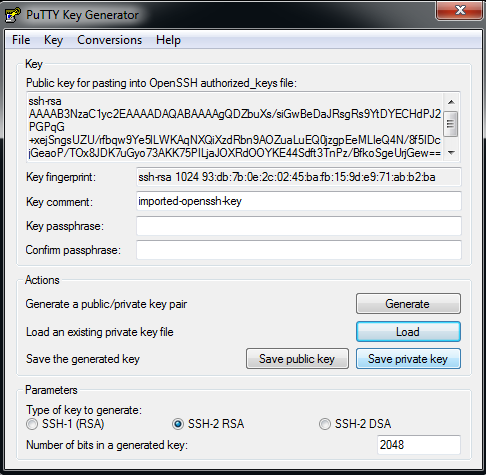
Convert private key to PuTTY supported format.
- Step 4: Open PuTTY -> Go to Connections -> SSH -> Auth to Browse for the newly generated key. (privkey.ppk)
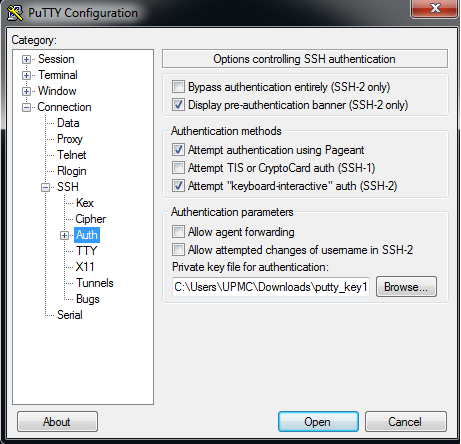
Load private key to PuTTY.
- Step 5: Go to Sessions and write the hostname that appears on your experiment’s resources page (e.g., if ssh login is: rahman@grenoble.iot-lab.info then Host Name: will be ‘grenoble.iot-lab.info‘ - the last part after the ‘@’) -> then click on Open
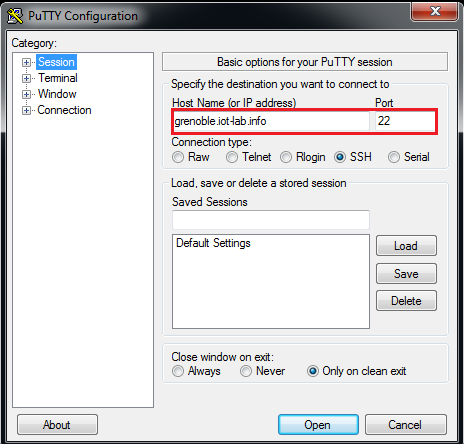
Configuring PuTTY with appropriate server name for SSH.
- Step 6: A command line tool will open and will ask your login name. Type the login name that appears in the tools tab of the experiment page (e.g., if ssh login is: rahman@grenoble.iot-lab.info then login as: will be ‘rahman‘ - the first part before the ‘@’) and press enter.
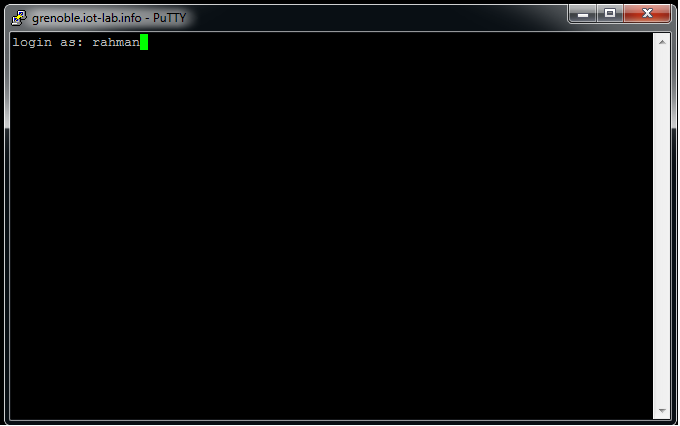
PuTTY SSH authentication.
- Step 7: Once you pressed enter the ssh connection will be established. From here you can carry on the tutorials.
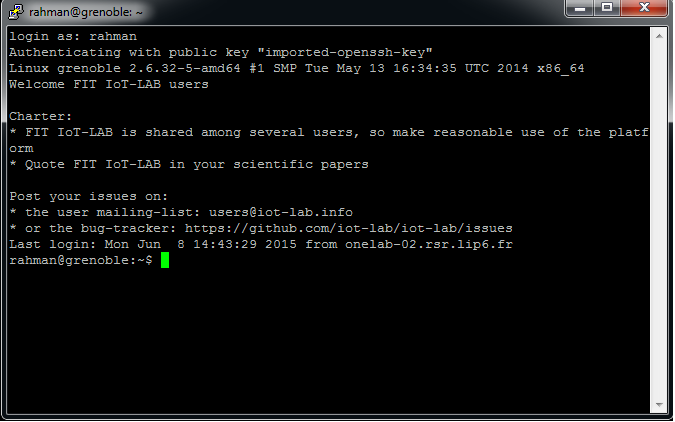
PuTTY SSH connection established.
Accessing NITOS-volos resources
Once you have successfully reserved the NITOS-volos nodes, go to the portal dashboard, and click on “Go to your reservation”. Here you will be able to see your reserved nodes, with instructions on how to access them directly.

NITOS-volos SSH command.
To access the resources through SSH, your user-specific SSH command will appear in the page.
Accessing FIT NITOS Paris resources
Once you have successfully reserved the NITOS-volos nodes, go to the portal dashboard, and click on “Go to your reservation”. Here you will be able to see your reserved nodes, with instructions on how to access them directly.

FIT NITOS Paris SSH command.
To access the resources through SSH, your user-specific SSH command will appear in the page.
Accessing FIT-IoT Lab resources
Once you have successfully reserved the NITOS-volos nodes, go to the portal dashboard, and click on “Go to your reservation”. Here you will be able to see your reserved nodes, with instructions on how to access them directly.

FIT-IoT Lab SSH command.
To access the resources through SSH, your user-specific SSH command will appear in the page.