Network Emulation with Dummynet
PlanetLab supports network emulation with dummynet on the nodes.
Dummynet is a live network emulation tool, originally designed for testing networking protocols, and since then used for a variety of applications including bandwidth management. It simulates/enforces queue and bandwidth limitations, delays, packet losses, and multipath effects. It also implements various scheduling algorithms. dummynet can be used on the machine running the user’s application, or on external boxes acting as routers or bridges.
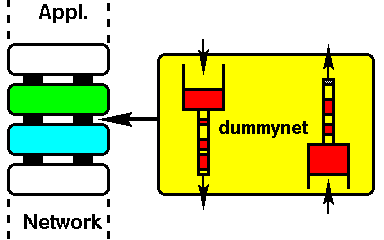
Dummynet intercepts selected traffic on its way through the network stack, as in the figure above, and passes packets to objects called pipes which implement a set of queues, a scheduler, and a link, all with configurable features (bandwidth, delay, loss rate, queue size, scheduling policy...).
Experiment Description
In this experiment we learn how to setup Dummynet on a node so to modify network bandwidth and traffic delay. We will test our setup by using a traffic prerformance measurement tool called IPref.
Prerequisites
Before starting this tutorial, please make sure that you have completed the following:
- You have an active account on the portal (to create an account please follow this tutorial: User sign-up)
- You have created or joined a project (to create/join a project please follow this tutorial: Lab)
- You have created a slice (to create a slice please follow this tutorial: Experiment )
- You have reserved some PlanetLab nodes (reservation-label)
Enable emulation on your slice
The ipfwslice package should already be installed in your slice, you can check if the command netconfig exists. To enable network emulation the slice should be setup with a tag. OneLab Support should be contacted requesting that emulation be enabled. The email should say:
“Can you please enable the emulation tag (vsys ipfw-be) for <slicename> on all nodes?”
Once the tag has been enabled net emulation on the nodes will be activated after a few minutes. You can verify that net emulation is enabled with the following command (on the reserved nodes)
ple2 ~$ netconfig show rules
01000        0           0 skipto tablearg ip from any to any lookup jail 1
02000 98791830 34862628612 allow ip from any to any
65535        0           0 allow ip from any to any
If you see an error like the one below the ipfw-be tag has not been properly set or you still have to wait for it to be activated on the node
ple2 ~$ netconfig
sh: /vsys/ipfw-be.in: No such file or directory
cat: /vsys/ipfw-be.out: No such file or directory
The netconfig command
The netconfig commandline tool is used to set up the pipes
neconfig config {client|server|service} arg [-t timeout] in <pipe in configuration> out <pipe out configuration>
         show {rules|pipes}
         delete {client|server|service} arg
         refresh [-t timeout] {CLIENT|SERVER|SERVICE} arg
Three modes of operation are supported:
client programs on the node connect to remote ports and/or addresses. Emulation intercepts traffic involving those ports/addresses
server programs on the node listen on specific ports. Emulation intercepts traffic on those ports, optionally limited to specific client addresses.
service the node runs both clients and servers, we can only specify the ports on which emulation is configured.
The argument has the form PORTLIST[@ADDRLIST], where ADDRLIST is an optional list of IP addresses and only supported for CLIENT and SERVER modes. PORTLIST and ADDRLIST can be specified as any valid port or address specifier in ipfw, e.g.
- a single value 443 or 10.20.30.40/24
- a comma-separated list 1111,2222,3333 1.2.3.4,5.6.7.8
- a range 1111-2222 (only for ports)
Addresses can also be specified as symbolic hostnames, and they are resolved when the rule is installed. Note that they always indicate the remote endpoint.
The timeout value follow the linux ‘date’ command format[2] and can be specified as follow: 1week, 2hours, 3days etc. and can be used to schedule the automatic removal of the emulated link. By default it will be removed automatically after a timeout of approximately 1 day.
Finally the in/out pipes configurations follows the following parameters:
bw bandwidth
Bandwidth, measured in Kbit/s, Mbit/s, KByte/s or MByte/s. A value of 0 (default) means unlimited bandwidth. The unit must immediately follow the number, e.g.
~$ netconfig config client IN bw 300Kbit/s OUT bw 100Kbit/s
delay ms-delay
Propagation delay, measured in milliseconds. The value is rounded to the next multiple of the clock tick (typically 1ms). The default value is 0, meaning no delay.
burst size
If the data to be sent exceeds the pipe’s bandwidth limit (and the pipe was previously idle), up to size bytes of data are allowed to bypass the dummynet scheduler, and will be sent as fast as the physical link allows. Any additional data will be transmitted at the rate specified by the pipe bandwidth. The burst size depends on how long the pipe has been idle; the effective burst size is calculated as follows: MAX( size , bw * pipe_idle_time).
On a given port a user can have one client and/or one server configuration or one service configuration. When a service configuration is installed any existing client and server configuration on the same port are removed. When a client or server configuration is installed any existing service configuration on the same port is removed.
show will display the pipes configured and the rules, delete will delete a specific configuration and finally refresh can be used to refresh the timeout on a particular configuration.
Testing with HTTP traffic
To better illustrate how to setup dummynet we can configure an emulated link and limit bandwidth for any HTTP traffic to the node to 1Mbit/s. Run the command
ple2 ~$ netconfig config client 80 IN bw 1Mbit/s OUT bw 0
The output should be similar to the following
10000         0           0 pipe 10000 ip from any to any in src-port 80 // client 80 1340
10000         0           0 pipe 10001 ip from any to any out dst-port 80 // client 80 1340
10000:   1.000 Mbit/s    0 ms burst 0
q141072  50 sl. 0 flows (1 buckets) sched 75536 weight 0 lmax 0 pri 0 droptail
 sched 75536 type FIFO flags 0x0 0 buckets 0 active
10001: unlimited         0 ms burst 0
q141073  50 sl. 0 flows (1 buckets) sched 75537 weight 0 lmax 0 pri 0 droptail
 sched 75537 type FIFO flags 0x0 0 buckets 0 active
Indicating that two pipes have been created (IN for inbound traffic and OUT for outbound traffic) and for each one one rule has been added (the first two lines in the output above). We can test the bandwidth limit by trying to download an ISO image with wget. Wget is a common Linux command that can be used to connect and download a file from a remote http server.
ple2 $ wget http://centos.mirrors.ovh.net/ftp.centos.org/7/isos/x86_64/CentOS-7-x86_64-NetInstall-1503.iso

--2015-05-27 14:02:36--  http://centos.mirrors.ovh.net/ftp.centos.org/7/isos/x86_64/CentOS-7-x86_64-NetInstall-1503.iso
Resolving centos.mirrors.ovh.net... 91.121.188.201, 91.121.189.201, 2001:41d0:1:bfc9::1, ...
Connecting to centos.mirrors.ovh.net|91.121.188.201|:80... connected.
HTTP request sent, awaiting response... 200 OK
Length: 377487360 (360M) [application/x-iso9660-image]
Saving to: `CentOS-7-x86_64-NetInstall-1503.iso'

0% [                                                                              ] 591,934      117K/s  eta 51m 56s
Download speed should not go over 120Kbyte/s. To remove this configuration
ple2 ~$ netconfig delete client 80
removing configuration 1340 client 80
Measuring transfer performance between two nodes with IPerf
In this scenario we are going to setup two nodes, ple2 and ple3, with dummynet and measure the changes in performances between the two with the tool IPerf (https://github.com/esnet/iperf). IPerf needs to be installed on both nodes
# install the iperf3 package on the first node
ple2 ~$ sudo yum install iperf3

# and then on the second node
ple3 ~$ sudo yum install iperf3
We can run IPerf on the first node (in this case ple2) as a server, this will launch a service that will wait for any connection on a port (by default 5201)
# run iperf3 on the first node as a server
ple2 ~$ iperf3 -s
-----------------------------------------------------------
Server listening on 5201
-----------------------------------------------------------
On the second node (ple3) we can run the client and let it connect and perform the test to the server, ple2
# send to the server (ple2)
ple3 ~$ iperf3 -c ple2

Connecting to host ple2, port 5201
[  5] local 132.227.62.121 port 44918 connected to 132.227.62.120 port 5201
[ ID] Interval       Transfer     Bandwidth
      Sent
[  5] 0.00-5.01 sec   144 MBytes   241 Mbits/sec
      Received
[  5] 0.00-5.01 sec   144 MBytes   240 Mbits/sec
The Iperf running as client will send data to the server and measure the transfer speed. To download data from the server we will have to specify the -R option
# download from the server (ple2)
ple3 ~$ iperf3 -R -c ple2

Connecting to host ple2, port 5201
[  5] local 132.227.62.121 port 48273 connected to 132.227.62.120 port 5201
[ ID] Interval       Transfer     Bandwidth
      Sent
[  5] 0.00-5.00 sec   155 MBytes   260 Mbits/sec
      Received
[  5] 0.00-5.00 sec   155 MBytes   259 Mbits/sec
The next step will be to configure a rule on port 5201 (the port used by IPerf) to modify either incoming or outgoing traffic by limiting the bandwidth or adding some latency. We start by adding 10ms delay to the out pipe for every address
# add a 10ms delay to the OUT pipe
ple3 ~$ netconfig config client 5201 IN delay 0 OUT delay 10ms
We run again IPerf and see the results
# measure network performance of the traffic from ple3 to ple2
ple3 ~$ iperf3 -c ple2

Connecting to host ple2, port 5201
[  5] local 132.227.62.121 port 57356 connected to 132.227.62.120 port 5201
[ ID] Interval       Transfer     Bandwidth
      Sent
[  5] 0.00-5.00 sec  27.6 MBytes  46.3 Mbits/sec
      Received
[  5] 0.00-5.00 sec  27.6 MBytes  46.3 Mbits/sec
IPerf sends data for 5 seconds but this time, because of the 10ms delay, it sent less data (27.6MB instead of ~150MB) and the measured transfer speed has been affected too. We also notice that the result is the same if we try to measure the traffic with the -R option (Why?).
Let’s remove this configuration and limit only the bandwidth of the traffic from ple3 to ple2 to 10Mbit/s
# delete the previous configuration
ple3 $ netconfig delete client 5201

# add a new rule limiting upload speed
ple3 $ netconfig config client 5201 IN delay 0 OUT bw 10Mb/s
And then run again IPerf
# test transfer from ple2 to ple3 (download speed)
ple3 ~$ iperf3 -c ple2

Connecting to host ple2, port 5201
[  5] local 132.227.62.121 port 56811 connected to 132.227.62.120 port 5201
[ ID] Interval       Transfer     Bandwidth
      Sent
[  5] 0.00-5.05 sec  6.00 MBytes  9.97 Mbits/sec
      Received
[  5] 0.00-5.05 sec  5.88 MBytes  9.77 Mbits/sec
Bandwidth has been limited at ~10Mbit/s for the outbound traffic as configured. Let’s measure traffic from ple2 to ple3, because we limited only the OUT pipe this time the measured speed should be unaltered
# test download speed
ple3 ~$ iperf3 -R -c ple2

Connecting to host ple2, port 5201
[  5] local 132.227.62.121 port 51149 connected to 132.227.62.120 port 5201
[ ID] Interval       Transfer     Bandwidth
      Sent
[  5] 0.00-5.00 sec   121 MBytes   203 Mbits/sec
      Received
[  5] 0.00-5.00 sec   121 MBytes   203 Mbits/sec
Further information
More information about ipfw and dummynet configuration: